【簡単】 AWS LightsailのWordPressサイトをSSL化する方法 【自動更新あり】
本記事ではAWS LightsailでWordPressを設定した際に、SSL設定を自動更新も含めて簡単に設定する方法を解説します。
本記事の内容
- AWS LightsailのWordPressサイトをSSL化する方法
- 正常にbitnamiのツールが起動しない時は…
この記事を書いている僕は、エンジニア歴が約4年で、WordPressのテーマ作成については、新規作成とメンテナンスを含めると100サイト以上は対応していて、様々なレンタルサーバやVPSなどで対応をした経験があります。
この記事を読むことによって、Lightsailに設置したWordPressをSSL化する方法が分かるようになります。
AWS LightsailのWordPressサイトをSSL化する方法

事前準備
今回の方法ではwwwの転送も行うので、wwwを含めたサブドメインの登録は済んでいる前提で進めます。
具体的には本ブログのドメインの例だと、it-web-life.com と www.it-web-life.com の両方がDNSで設定されている状態で始める前提です。
AWS Lightsailで、SSL更新をする方法
結論としては以下の手順で進めていきます。
- Lightsailにて、SSH接続
- 「
$ sudo /opt/bitnami/bncert-tool」を実行 - 画面の指示に従って入力・選択していき、設定する
- ツールが自動で設定をしてくれて、設定完了
詳細な手順を解説していきます。ドメインやメールアドレスだけ、自分のものに置き換えて、同じように進めれば問題ないはずです。
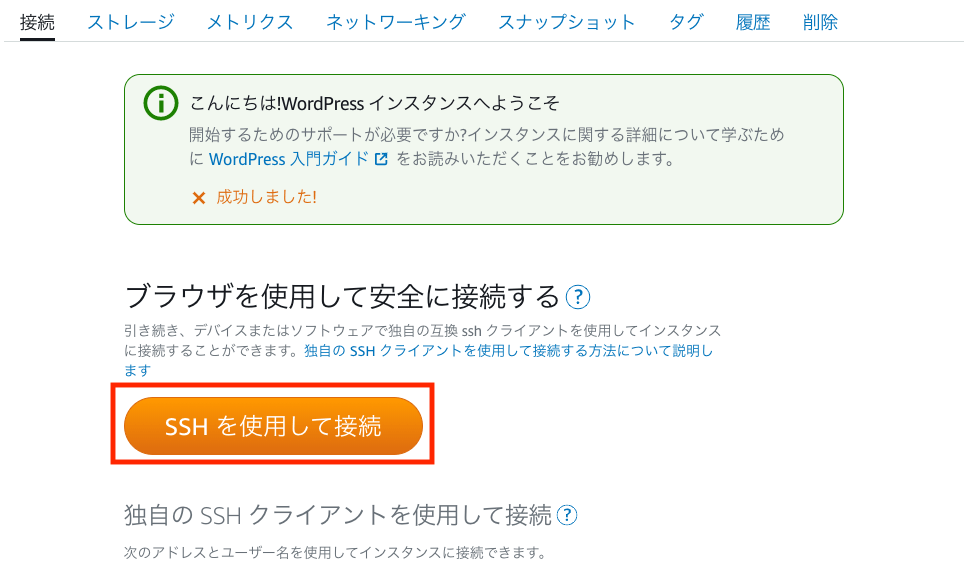
1. LightailにSSHでログインします。
SSHで接続する方法1
Lightsailの管理画面でインスタンスを選択した最初の画面(接続のタブ)に「SSHを仕様して接続」があるのでここをクリックすれば、ブラウザ上でSSH接続ができます。
SSHで接続する方法2
普通にターミナルなどからSSHキーを使って、コマンドでSSH接続します。
2. bncert-toolを起動する
以前は使っているツールが「bnhelper-tool」でしたが、現在は「bncert」(bncert-tool)を利用するようになっています。
いろいろ調べているとbncert-tool、Legoクライアント や Certbotクライアントなどが出てきますが、 Certbotクライアントは自動更新ができなかったりするので、「bncert-tool」を使うことをお勧めします。公式サイトの「Amazon Lightsail の WordPress インスタンスで HTTPS を有効化する」が参考になります。
LightsailのサーバにSSH接続します。
sudo /opt/bitnami/bncert-toolを実行します。
sudo /opt/bitnami/bncert-toolちなみに実行時(sudo /opt/bitnami/bncert-toolの後)に、バージョンをアップデートしますかということを聞かれたら「Y」(yesの意味)を入力し、アップデートしましょう。
Let’s Encriptの設定
ここからは表示される質問に回答する形で、セットアップをしていきます。
ここでは本ブログの「https://it-web-life.com」を例に設定をしていきます。
今回は、以下の転送ルールで設定していきます。
通常は同じでよいかと。wwwありのサブドメインをDNSで設定していない場合は事前に設定しておく必要があります。
・wwwあり(https://it-web-life.com)は、wwwなし(https://it-web-life.com)に転送する
Domain list []: it-web-life.com www.it-web-life.com半角スペースで区切って複数入力ができます。今回はwww無しと有りの両方を登録します。(任意のドメインに置き換えてください)
Enable HTTP to HTTPS redirection [Y/n]: YhttpへのアクセスはhttpsへリダイレクトするかはY(Yes)にします
Enable non-www to www redirection [Y/n]: nwww無しのアクセスをwwwにリダイレクトするかはn(No)にします
Enable www to non-www redirection [y/N]: Ywww有りのアクセスをwww無しにリダイレクトするかはy(Yes)にします
Do you agree to these changes? [Y/n]: Yこれから実行される作業の一覧が表示されるのでY(Yes)にします
E-mail address []: xxxx@xxxxx.comメールアドレスの登録が必要なので、受信できるメールアドレスを入力します。(任意のメールアドレスに置き換えてください)
Do you agree to the Let's Encrypt Subscriber Agreement? [Y/n]: Y同意を求められるのでY(Yes)にします。
Press [Enter] to continue:Enterを押して続けます。
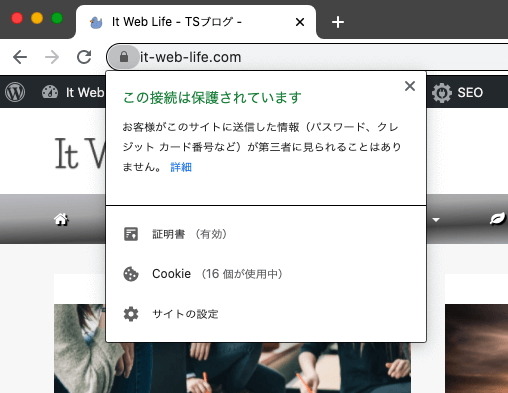
これで完了です。SSLが設定され、サイトも問題なくSSL化できました。
ページを更新すると、SSL化できています。(通常は数秒で完了しますが、少し時間がかかる場合もあります。)
Let’s Encript でSSL証明書の取得、サーバの設定、SSL証明書の自動更新設定も行ってくれます。
Let’s Encriptは3ヶ月で期限が切れるので更新が必要ですが、自動で更新する設定になるので今後は何もする必要なく、自動でSSL証明書は更新されることになります。
※公式サイトの記載を見ると、「bncertツールは、有効期限が切れる前、80日ごとに証明書の自動更新を実行します。」となっています。
実行の流れを一覧にすると以下のようになります。
----------------------------------------------------------------------------
Welcome to the Bitnami HTTPS Configuration tool.

----------------------------------------------------------------------------
Domains

Please provide a valid space-separated list of domains for which you wish to
configure your web server.

Domain list []: it-web-life.com www.it-web-life.com

----------------------------------------------------------------------------
Enable/disable redirections

Please select the redirections you wish to enable or disable on your Bitnami
installation.


Enable HTTP to HTTPS redirection [Y/n]: Y


Enable non-www to www redirection [Y/n]: n


Enable www to non-www redirection [y/N]: y


----------------------------------------------------------------------------
Changes to perform

The following changes will be performed to your Bitnami installation:

1. Stop web server
2. Configure web server to use a free Let's Encrypt certificate for the domains:
it-web-life.com www.it-web-life.com
3. Configure a cron job to automatically renew the certificate each month
4. Configure web server name to: it-web-life.com
5. Enable HTTP to HTTPS redirection (example: redirect https://it-web-life.com to
https://it-web-life.com)
6. Enable www to non-www redirection (example: redirect www.it-web-life.com to
it-web-life.com)
7. Start web server once all changes have been performed


Do you agree to these changes? [Y/n]:Y

----------------------------------------------------------------------------
Create a free HTTPS certificate with Let's Encrypt

Please provide a valid e-mail address for which to associate your Let's Encrypt
certificate.

Domain list: it-web-life.com www.it-web-life.com

Server name: it-web-life.com

E-mail address []: xxxx@xxxxx.com

The Let's Encrypt Subscriber Agreement can be found at:

https://letsencrypt.org/documents/LE-SA-v1.2-November-15-2017.pdf

Do you agree to the Let's Encrypt Subscriber Agreement? [Y/n]: Y


----------------------------------------------------------------------------
Performing changes to your installation

The Bitnami HTTPS Configuration Tool will perform any necessary actions to your
Bitnami installation. This may take some time, please be patient.

----------------------------------------------------------------------------
Performing changes to your installation

The Bitnami HTTPS Configuration Tool will perform any necessary actions to your
Bitnami installation. This may take some time, please be patient.

----------------------------------------------------------------------------
Success

The Bitnami HTTPS Configuration Tool succeeded in modifying your installation.

The configuration report is shown below.

Backup files:
* /opt/bitnami/apache2/conf/httpd.conf.back.202011240800
* /opt/bitnami/apache2/conf/bitnami/bitnami-apps-prefix.conf.back.202011240800
* /opt/bitnami/apache2/conf/bitnami/bitnami.conf.back.202011240800

Find more details in the log file:

/tmp/bncert-202011240800.log

If you find any issues, please check Bitnami Support forums at:

https://community.bitnami.com

Press [Enter] to continue:
ちなみに作業ログは、/tmp/bncert-yyyymmddxxxx.logの形で保存されるようです。
Lightsailの公式にも色々なSSL化の手順が載っていますが、「bncert-tool」を使うのがオススメです。
まとめ
AWS LightsailのWordPressでSSL化のセットアップをする時は、SSH接続をして「sudo /opt/bitnami/bncert-tool」を実行し、画面の指示に従って進めば、簡単にSSL化ができます。
注意点として、Webで調べていると色々なSSL化の方法が出てきますが、古い情報などもあり使えない方法も多いので精査する必要があるので、随時最新の方法を調べてから実行することをお勧めします。
※当サイトでは一部のリンクについてアフィリエイトプログラムを利用して商品を紹介しています